Authentik + kubernetes

Background
I have for a long time wanted to add a SSO solution to my homelab, and I decided on Authentik to be my savior. Authentik have official documentation here on kubernetes. Since this have been stuck on my to-do list for too long, it now feels like the right time, as we are learning about importance of authentication and authorization these days at school.
installation overview
This will be installed in kubernetes as sated previously, using Helm as per the documentation. To manage my kubernetes cluster I use ansible for management, and I will set up tasks to create Namespace, Persistent Volumes, Persistent Volume Claims, and execute the Helm chart through Ansible. The guide for minimal config uses clear text passwords, which is a bad practice I want to avoid. To solve that all passwords are stored in Ansible-Vault
Installation process
Create task file
The very first thing we need in our task file, named authentik.yml is to set up the block and include needed files.
- block:
  - include_vars: secrets.yml
    tags: always
Step 1 - create the namespace
YAML-configuration for namespace using ansible:
  - name: create namespace
    tags: management,authentik
    kubernetes.core.k8s:
      kind: Namespace
      name: authentik
      api_version: v1
      state: present
Generate passwords
The first thing we need to do is add passwords to the secrets.yml file in the vars directory. To generate random passwords we can utilize the /dev/urandom together with tr command. Authentik also want a secure key to send anonymous usage data, that can be generated with openssl
password generation
tr -dc A-Za-z0-9 </dev/urandom | head -c 13; echo
secret key
openssl rand 60 | base64 -w 0
Inside secrets.yml
authentik_pg_pass: secretpass1
authentik_redis_pass: secretpass2
authentik_secret_key: secret_key
YAML-configuration for the secrets, this will grab passwords from the secrets.yml file, and store the passwords in a kubernetes secret. First a file named authentik-secret.yml.j2 is created in the templates directory.
The secret.yml file must be encrypted with ansible-vault! A good habit is to never decrypt it, but rather use
ansible-vault edit when you edit the values.Persistent volumes
I have, by choice decided to not have automatic provisioning of persistent volumes and persistent volume claims in my cluster. This results in a bit more work when i set up new services, but for a small cluster in a home lab it is perfect. The benefits is that i have full control over my folder and folder structure on my NFS server. After reading the Authentik documentation (which does not have persistence in their minimal config!) I wanted to add persistent volume to the server deployment, and the postgresql database. By inspecting the files for the helm chart over at artifacthub i found how to implement it in values, but more on that in later step. First I need to create the directories in NFS server and prepare them for persistent volumes.
Creating directories
In the directories where i have all my persistent storage I create one directory for the server deployment, and one for postgresql. The command below will create those, and subfolders in authentik
mkdir authentik authentik-pg authentik/media authentik/certs authentik/custom-templates /blueprints
In the NFS server, ensure that uid 1000 have read/write permission in the authentik directory, and 1001 have permission in authentik-pg
Setting PV values
It is not necessary, but i use jinja2 templates for my PV and PVC, so I can read values from the values file. Inside the values file I put the values for server address and directory location.
authentik_path: /mnt/k3s_persistent/authentik
authentik_pg_path: /mnt/k3s_persistent/authentik-pg
pv_server:  192.168.10.11
authentik-pv
filename authentik-pv.yml.j2
apiVersion: v1
kind: PersistentVolume
metadata:
  name: authentik-pv
  namespace: authentik
spec:
  capacity:
    storage: 10Gi
  accessModes:
    - ReadWriteMany
  persistentVolumeReclaimPolicy: Retain
  storageClassName: authentik-volume
  nfs:
    path: {{ authentik_path }}
    server: {{ pv_server }}
authentik-pg-pv
filename authentik-pg-pv.yml.j2
apiVersion: v1
kind: PersistentVolume
metadata:
  name: authentik-pg-pv
  namespace: authentik
spec:
  capacity:
    storage: 5Gi
  accessModes:
    - ReadWriteOnce
  persistentVolumeReclaimPolicy: Retain
  storageClassName: authentik-pg-volume
  nfs:
    path: {{ authentik_pg_path }}
    server: {{ pv_server }}
authentik-pvc
filename authentik-pvc.yml.j2
apiVersion: v1
kind: PersistentVolumeClaim
metadata:
  namespace: authentik
  name: authentik-volume
spec:
  storageClassName: authentik-volume
  accessModes:
    - ReadWriteMany
  resources:
    requests:
      storage: 10Gi
authentik-pg-pvc
filename authentik-pg-pvc.yml.j2
apiVersion: v1
kind: PersistentVolumeClaim
metadata:
  namespace: authentik
  name: authentik-pg-volume
spec:
  storageClassName: authentik-pg-volume
  accessModes:
    - ReadWriteOnce
  resources:
    requests:
      storage: 5Gi
Adding to task file
Adding these blocks to the authentik.yml task file:
  - name: authentik | create authentik pv
    tags: authentik
    kubernetes.core.k8s:
      template: authentik-pv.yml.j2

  - name: authentik | create authentik pvc
    tags: authentik
    kubernetes.core.k8s:
      template: authentik-pvc.yml.j2

  - name: authentik | create authentik-pg pv
    tags: authentik
    kubernetes.core.k8s:
      template: authentik-pg-pv.yml.j2

  - name: authentik | create authentik-pg pvc
    tags: authentik
    kubernetes.core.k8s:
      template: authentik-pg-pvc.yml.j2
Helm Chart
At this stage we have done all the prerequisites, and we can now focus on the chart it self. Ansible has a helm module in the kubernetes core collection, in the official documentation there are both available parameters and some good examples to look at. There are two steps to this, adding the chart, and using the chart. I decided to add values directly in the task file, instead of creating a separate values file.
Adding the chart
In the task file authentik.yml:
    # Add repository
  - name: Add authentik chart repo
    tags: authentik
    kubernetes.core.helm_repository:
      name: authentik
      repo_url: "https://charts.goauthentik.io"
Using the chart
Under follows my entire configuration that I added in the task file. It consist of the minimum configuration from authentik, with email. And after reading in the helm documentation i found where to add the persistent storage, and how to adapt it properly to my ingress controller. The config below might seem a bit lengthy so let's break it down.
The authentik section is more or less identical to the minimal configuration, except that I read values from my values.yml and secret.yml file.
The server section I divert more from the minimal configs. I added volumes and volumeMounts, where volume points back to the persistent volume claim, created in an earlier step, and volumeMounts mounts it's subfolders to correct folders in the container.
Under the ingress section inside server I had to apply some custom annotations and tls settings for it to work properly with my ingress controller.
The postresql section I added persistent storage as well. This is done slightly different than in the server section. The different methods where discovered by diving in to the helm documentation for authentik. In the file with default values, there was examples of these methods.
    # Chart deployment with values
  - name: Deploy Authentik chart
    tags: authentik
    kubernetes.core.helm:
      name: authentik
      chart_ref: authentik/authentik
      release_namespace: authentik
      force: True
      wait: True
      update_repo_cache: True
      state: present
      values:
        authentik:
          secret_key: "{{ authentik_secret_key }}"  # Key generated in earlier step
          error_reporting:
            enabled: true
          postgresql:
            password: "{{ authentik_pg_pass }}" # Vault variable
          email: # Setting up email with my variables
            host: "{{ email_server }}"
            port: 465
            username: "{{ email_user }}"
            password: "{{ email_pass }}"
            use_ssl: true
            timeout: 30
            from: "{{ email_from }}"
        server:
          volumes:
            - name: authentik-storage # Using the persistent storage i set up earlier
              persistentVolumeClaim:
                claimName: authentik-volume

          volumeMounts: # Mounting the subfolder using subPath
            - name: authentik-storage
              mountPath: /media
              subPath: media
            - name: authentik-storage
              mountPath: /certs
              subPath: certs
            - name: authentik-storage
              mountPath: /custom-templates
              subPath: custom-templates
            - name: authentik-storage
              mountPath: /blueprints
              subPath: blueprints
          ingress:
            ingressClassName: traefik
            enabled: true
            hosts:
              - "auth.nerdiverset.no"
            annotations: # Annotations to connect to my ingress controller in correct way
              cert-manager.io/cluster-issuer: cloudflare-letsencrypt-issuer
              traefik.ingress.kubernetes.io/router.entrypoints: websecure2
              traefik.ingress.kubernetes.io/router.tls: "true"
            tls:
              - secretName: auth.nerdiverset.no-tls
                hosts:
                  - auth.nerdiverset.no
        postgresql:
          enabled: true
          auth:
            password: "{{ authentik_pg_pass }}"
          primary:
            persistence: # adding persistence to postgresql
              enabled: true
              existingClaim: authentik-pg-volume
        redis:
          enabled: true
Apply the helm chart to the cluster!
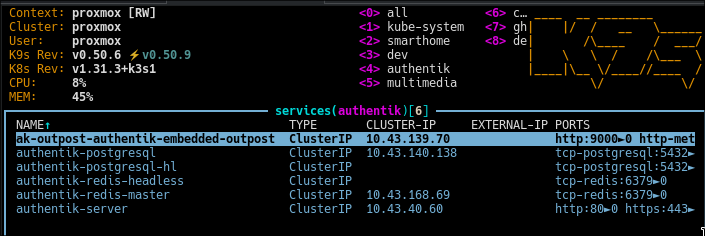
With all configuration now complete, we can apply all that we have done with ansible-playbook -t authentik --vault-password-file PATH_TO_PASS_FILE and after that has completed, we should have 4 pods, here displayed using k9s tool.

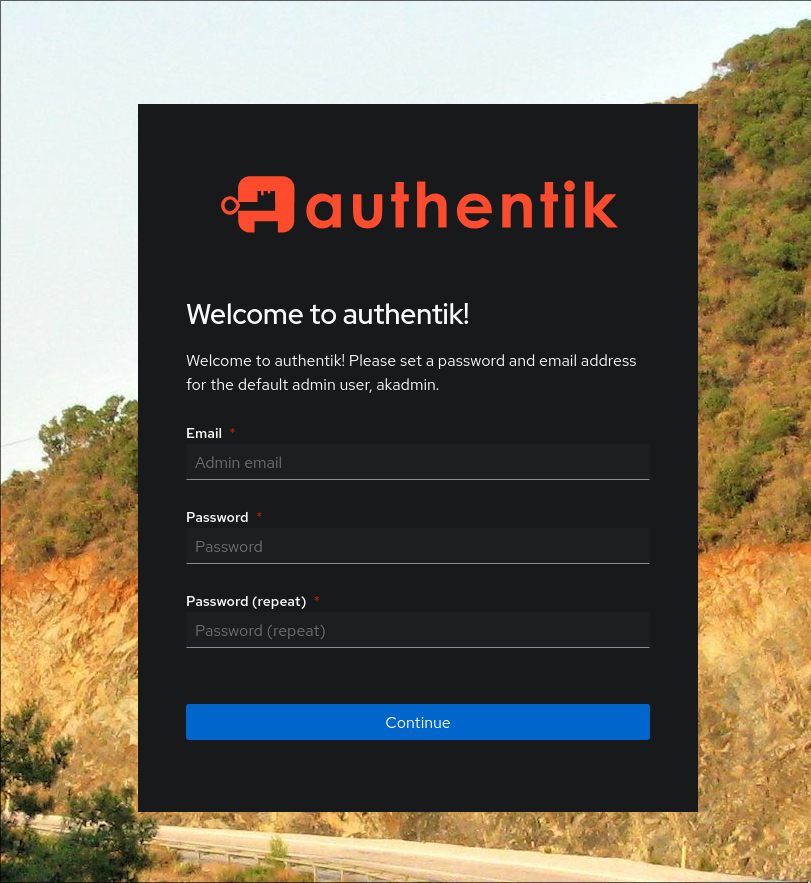
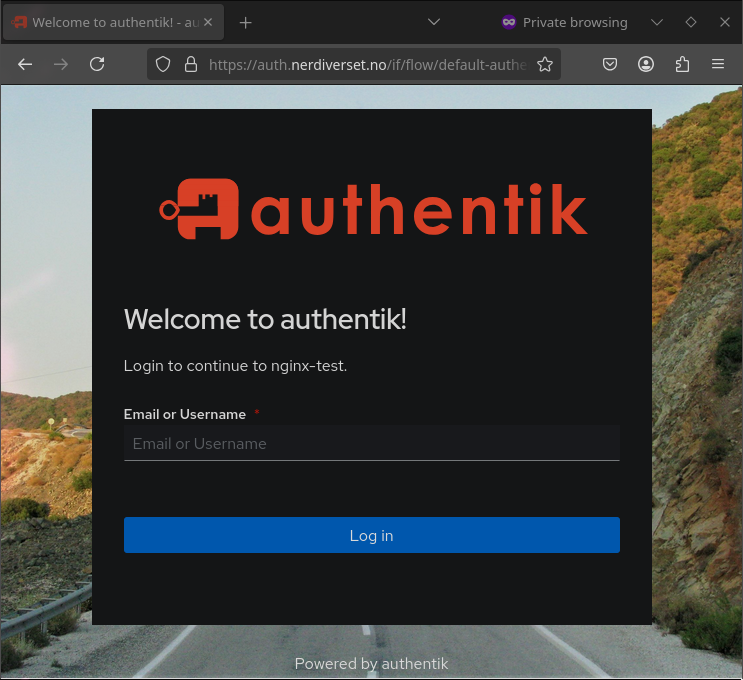
Superb, all seems to be working! Now it is time to set it up! According to the docs we must visit https://<ingress-host-name>/if/flow/initial-setup/` to set up the akadmin user. Let's see what that url can provide us with.
Great! One thing I really want to test, is the forward proxy, that can let you protect any site in your cluster. For that we need to allow ingress routes across namespaces. Looking at the traefik documentation we see that we just need to add a snippet to our configuration. K3s which i use for my cluster store this in the manifest folder on the master node.
snippet to add
filename: /var/lib/rancher/k3s/server/manifests/traefik-config.yaml
providers:
  kubernetesCRD:
    allowCrossNamespace: true
With the help of the Traefik ingress controller, we can now use a middleware to ensure only authenticated traffic reaches our website. But first we must create the app inside authentik.
Proxy app
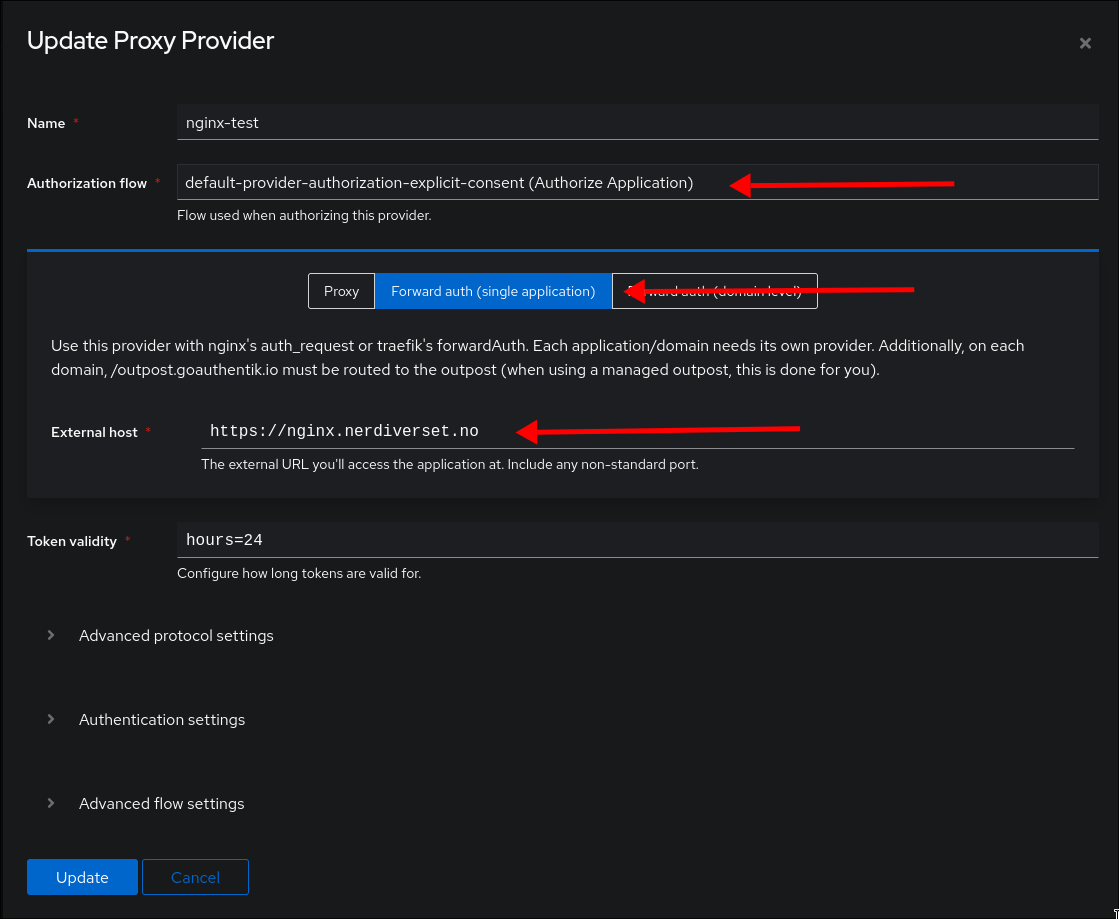
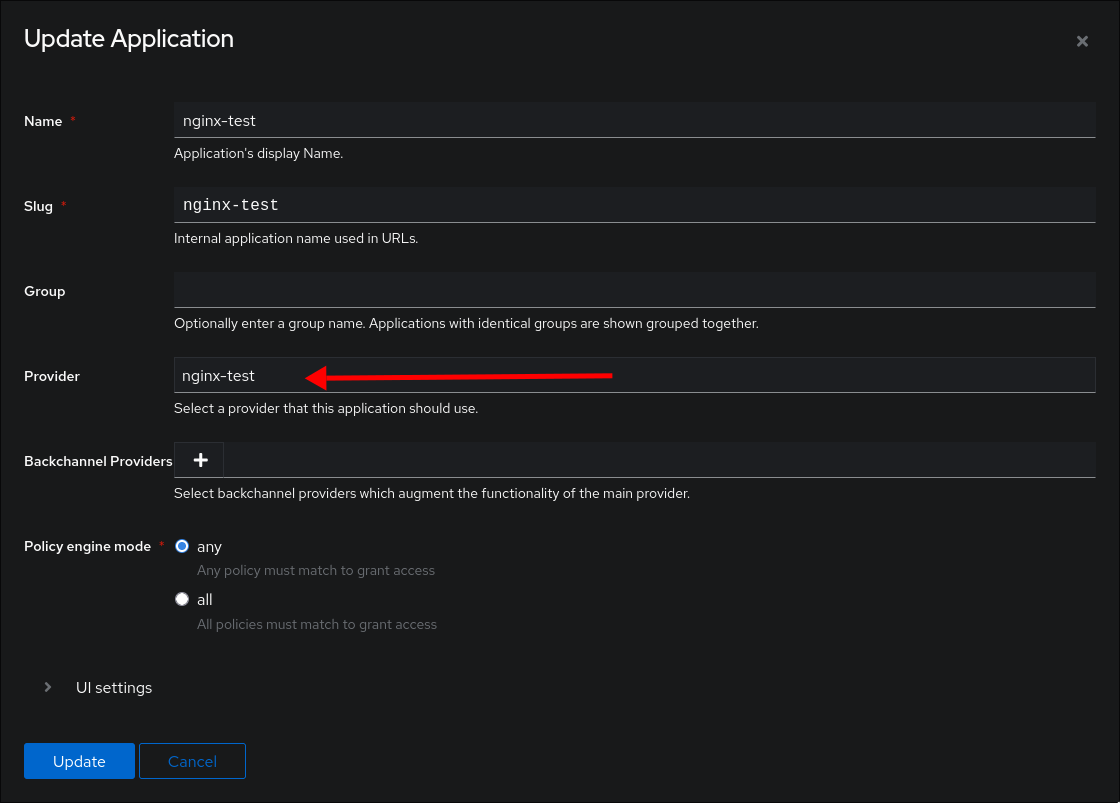
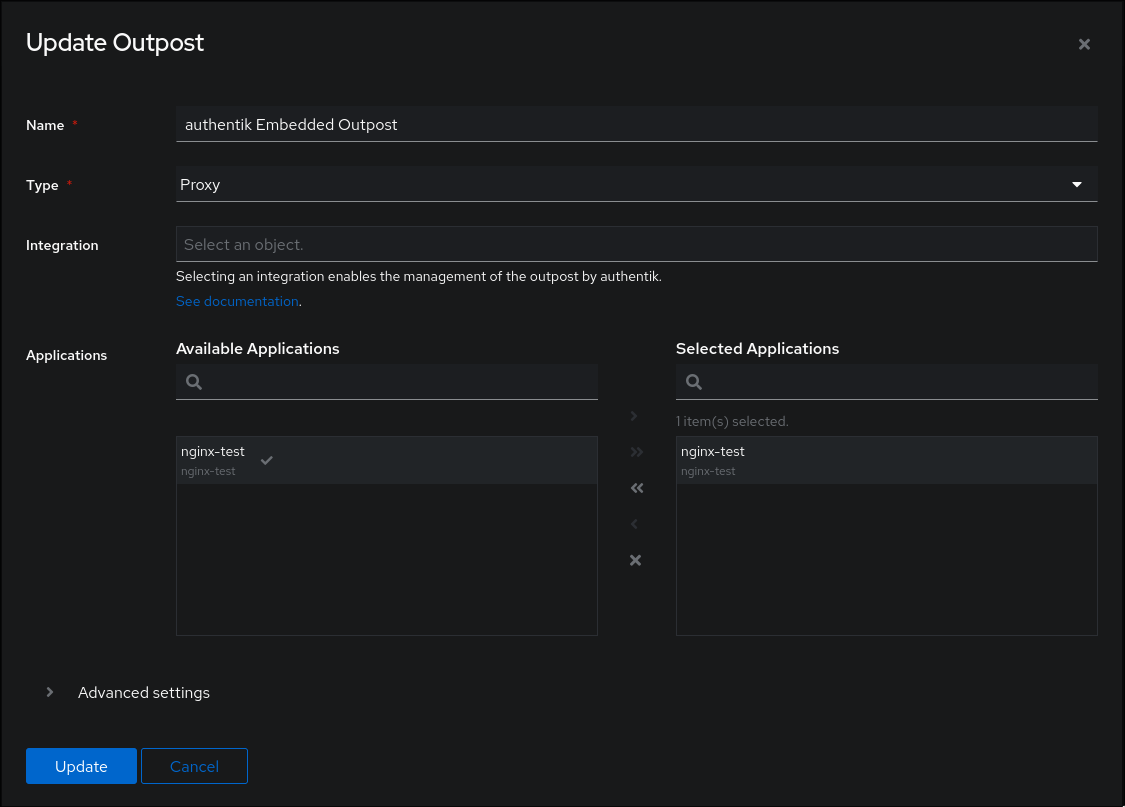
Inside Authentik we need to create one Provider, one Application and link it to an Outpost.
When creating a new proxy provider, we set the Authorization flow to explicit, the proxy type to forward auth, and we give our external url.
When making the app we simply have to pair it with the provider we just created
And finally we add that application to the outpost.
Kubernetes configuration
First we need to create the middleware that will reroute to outpost for forward authentication.
This file is just copied from the docs, but we need to change the address. Here I have set it to the internal address that kubernetes uses. One more change i discovered, was that to make HTTP Basic AUTH work one more header is needed. Adding Authorization lets Authentik send the header with login information.
apiVersion: traefik.io/v1alpha1
kind: Middleware
metadata:
  name: authentik
  namespace: authentik
spec:
  forwardAuth:
    address: http://ak-outpost-authentik-embedded-outpost.authentik:9000/outpost.goauthentik.io/auth/traefik
    trustForwardHeader: true
    authResponseHeaders:
      - Authorization
      - X-authentik-username
      - X-authentik-groups
      - X-authentik-entitlements
      - X-authentik-email
      - X-authentik-name
      - X-authentik-uid
      - X-authentik-jwt
      - X-authentik-meta-jwks
      - X-authentik-meta-outpost
      - X-authentik-meta-provider
      - X-authentik-meta-app
      - X-authentik-meta-version
K9s displaying services in the authentik namespace, and we can see the name of the outpost service
The last piece of the puzzle to get the proxy authentication working, is telling the ingress to use the middleware. In the annotation of the ingress file, we add traefik.ingress.kubernetes.io/router.middlewares: authentik-authentik@kubernetescrd and since the middleware is in another namespace we need to address it properly. authentik-authentik@kubernetescrd indicates middleware-namespace@kubernetescrd.
The ingress file:
apiVersion: networking.k8s.io/v1
kind: Ingress
metadata:
  name: nginxtest
  namespace: dev
  annotations:
     cert-manager.io/cluster-issuer: cloudflare-letsencrypt-issuer
     traefik.ingress.kubernetes.io/router.entrypoints: websecure2
     traefik.ingress.kubernetes.io/router.tls: "true"
     traefik.ingress.kubernetes.io/router.middlewares: authentik-authentik@kubernetescrd
spec:
  ingressClassName: traefik
  rules:
    - host: nginx.nerdiverset.no
      http:
        paths:
          - path: /
            pathType: Prefix
            backend:
              service:
                name: nginxtest
                port:
                  number: 80
  tls:
    - hosts:
        - nginx.nerdiverset.no
      secretName: nginx-tls
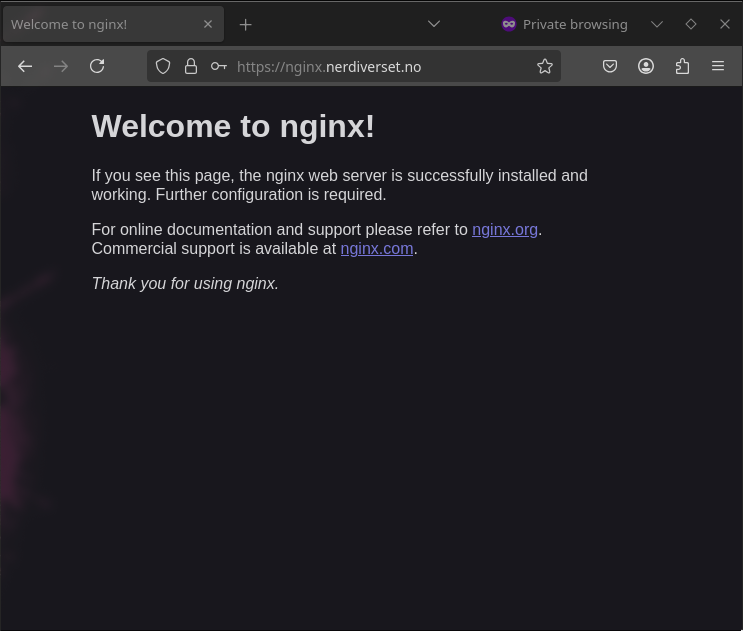
After applying the middleware, and ingress to our basic nginx deployment we can try and access it, and see if it works! And when I go to the URL, I do not get the nginx page, but an authentik login page, hooray!
And after successfully logging in, I get redirected to correct site.
Summary
After months of having Authentik on my to-do list I am very satisfied with finally setting it up. There was initially a bunch of research in how best to use the helm charts in regards of keeping values safe, which lead me down rabbit holes on SOPS and AGE for encrypting values. But since I already manage my kubernetes cluster with ansible, the easiest was just to continue with that, and keep my secrets file in ansible vault.
Personally I felt that the minimal working configuration, and the more advanced configuration in the official docs was too far apart. I was missing a more middle ground example. But after diving in to the official helm chart page of Authentik, I found all the available values and configuration I needed to make.
To do!
Since this has only resulted in a fairly basic installation, there is still a lot to configure. In the list below is everything I can think of from the top of my head
- Get email working
- ̶A̶d̶d̶ ̶M̶F̶A̶ - That was easy! just had to go in user portal, and not admin portal.
- Add self hosted services


Comments ()